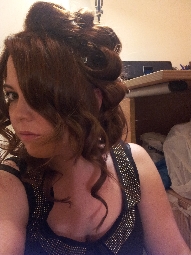
For my first post in this blog, I am going to attempt to do my best to resemble that amazing style. Now, obviously it won't look identical because a) I don't look like Cheryl; and b) I am not a professional hair stylish like the super talented Lisa Laudat, who is the lady behind Cheryl's hair and make up.
To help me know what to do, I have looked at many photos and watched lots of footage of Cheryl on tour, but also, recently Lisa Laudat did a Masterclass for L'Oreal and a lady called Ree did a blog about it. If you haven't seen it, I would definitly recommend it as it is where I learnt from. Find it here: http://www.reallyree.com/2012/11/elnett-styling-sprays-for-cheryl-cole.html
Ok.. Here's what I did:
First, here are the
tools and products that I used:
The round brush I
am using is from the Head Jog range – number 78, ionic ceramic; and the back
comb brush, also from the Hed Jog range number 50.
The straightners
are GHD and the curling wand is by Diva – Big Hot Wand. All perchased from
Sally Salon Services (www.sallyexpress.com).
The hairdryer is by
Nutriheat and I used the narrow end for this look.
Products:
Left to Right:
L’Oreal Paris Elnett Satin Hairspray Supreme Hold, Infinite Shine;
L’Oreal Paris Studio Line Silk and Gloss Volume
Mouse; L’Oreal Professionnel Paris Volume Lift Tecniart Force 3; L’Oreal Paris
Now, if you haven’t
guessed already, L’Oreal is my favourite hair product range because they just seem to
work for my hair so perfectly. They actually do what they say they do and they
smell divine!
To begin, I washed
my hair with a good Shampoo and applied conditioner from mid lengths to ends
only (I use Aussie Shampoo, but pick one that is best for your hair type).
This is my ‘before’
shot……. Mmmm.. attractive!
1. I used L’Oreal
Elvive New Extraordinary Oil on the very tips of my hair to help the ends. This
oil is amazing! It finishes off the ends of your hair so nicely and smells
heavenly!
2. Next, I
sectioned my hair a layer at a time and sprayed L’Oreal Professionnel Paris
Volume Lift Tecniart Force 3 at the roots on each layer.
It comes out a bit
like a mouse and you have to use your fingers to rub it in to the hair. I did
this for each layer of my hair, right to the top.
3. Next, I applied
L’Oreal Paris Studio Line Silk and Gloss Volume Mouse to the lengths of my hair
(about the size of my palm) making sure to work it all the way through.
As you can see my
hair is naturally quite curly so I need to work quick before it dries too much!
4. Next I took the
end off of my hair drier, flipped my head over and blow dried my hair roughly.
Make sure you flip your head over to add extra volume!
I have to say, I
quite liked it jut like this, but it’s not the look I am trying to get today. I
will remember this one for one of my ‘can’t really be bothered’ days!
5. Now this is the
bit that takes the time, but don’t rush it because it is the part that will
give you the volume!
Section the hair
and securely clip the rest back. Start on the bottom layer and work up towards
the crown of your head. I sprayed L’Oreal Paris Elnett Satin Heat Styling Spray
Volume on each section near the roots before blow drying to help add extra
volume and hold.
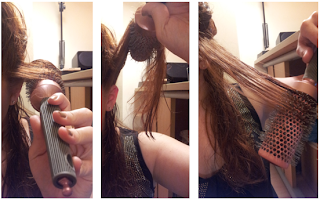
When you blow dry
your hair with the round brush, hold it like this to start with. Make sure you
have the narrow end on your hair drier and then gently pull the hair upwards
and blow dry close to the roots following the direction of the hair upwards
towards the brush. When you get about half way along the length of the hair, go
back to the start and repeat. Do this 4 or 5 times making sure you pull upwards
and blow dry from underneath. Then, blow dry from the top moving the brush
underneath the hair towards the ends. When you get to the ends, rotate the
brush to blow dry the hair under just slightly.
You can already see
the volume in this one section of hair. Now you repeat this method in small
sections over the rest of your head!
*Warning* It get’s
quite warm with the hair drier on for a long time, especially if you have thick
hair like me, so you might want to open a window at this point!
6. When you do the
back of your hair, try to keep you brush at the same angle as your head to get
the best shape to the hair. A trick I have discovered is to hold my hair drier
upside down so that I can blow dry the hair from underneath more comfortably.
It is a bit fiddly, but not too bad once you get the hang of it.
7. You can see in
the photo below that my hair is starting to get some shape and volume at the
roots. Now I am near the crown, I started to blow dry section by section from
the back, pulling it upwards and backwards to get Cheryl’s signature ‘bouffant’
look. I did this all the way to the very front.
8. Now it is all
dried and I have given it as much volume as I can using the round brush, I used
the Diva Big Hot Want to create curls.
9. I started by
sectioning off the front section of my hair (in front of my ears) and clipping
it up. I will sort this part out later.
10. *Please take
care when using any curling wand as they get extremely hot! The Diva Big Hot Wand
can reach 200 degrees and I found out what happens when you accidently touch it
on your skin! The other day I burnt my hand quite badly, but it was my own
fault because the Diva Big Hot Wand actually comes with a heat protection
glove! Please use it! I wore it this time!
11. This time,
start at the top of your head and take small sections of hair and spray a
little L’Oreal Paris Elnett Satin Heat Styling Spray Volume near to the roots.
Curl the hair around the wand and hold in place for 10-15 seconds. Gently
release by sliding the wand out from the curl and pin the curl in place
securely. Spray with a little L’Oreal Paris Elnett Satin Hairspray Supreme Hold
to keep it’s shape whilst you do the rest of the head.
12. Repeat in small
sections gradually working your way around and down the hair. As you move
through the hair, alternate the direction of curl to give a much more natural
end result.
13. Curl the front
sections near to the face. I haven’t clipped mine up as I will be plaiting them
later, but if you want them to last longer, clip them as the rest of the hair.
When you curl the
very front sections of hair, make sure the direction of curl points away from
the face. This will help to open up the overall look.
When
you have finished, spray the whole head with hairspray and leave for a while to
set.
14.
Carefully remove the hair clips and run your fingers through the curls to
release them a little from the hairspray. This will help them to fall more
naturally.
15.
Once you have let all the curls loose, it’s time to backcomb!
Now
be careful with this – you don’t want to ruin your hair or make it look like
you’ve just woken up!
Start
at the crown and section part off. This will fall over the top to hide the back
combing.
I
parted a small section from the crown, sprayed a little hairspray on the front
and back then I used the Hed Jog number 50 brush to carefully backcomb it. The
picture above shows the section of hair standing on it’s own after backcombing!
This shows you can make you hair as big as you want! I don’t want it quite this
big, so will loosen it a bit in a minute.
Flip
that section forwards and repeat for the next section underneath. You don’t
have to go all the way down the you neck, I would say about half way would be
enough to hold it up.
Flip
the hair back and apply hair spray to hold it in place.
You
can stop here, apply some more hairspray and enjoy your fab bouncy curls, but
today I mentioned I was trying to get Chery’s A Million Lights Tour hairstyle,
so I will continue…
Cheryl
has beautiful long hair – much longer than mine – and this helps to pull her
curls downwards and elongate them nicely. On each side she had 3 tight plaits
that helped to show off the bouffant.
Here’s
my attempt:
16.
Next, the front section.
Lisa
Laudat (Cheryl’s hair and makeup artist) suggests to use the width of your eyes
as a guide to how much hair to pull back.
Use
a comb to carefully collect a small section of hair at the front and pin it to
the head using Kirby grips. To create the ‘poof’ at the front, as you pull the
hair back, push it forwards a little too.
Again,
you can stop here, if this is the look you want to achieve, but I am going to
try and do the plaits on each side, so I will continue…
17.
As before, section the front part of the hair off and clip back the rest. Split
this section into three, clipping the top 2 back for now. Plait the hair along
the side of the head and secure with a small elastic. If, like me, your plaits
stuck out a little, use a hair grip to fasten it tight to the head. Repeat for
the other 2 sections. Spray with hairspray.
18. Repeat this on the other side of the head and you’re done!
I
hope you enjoyed reading this blog post and I would love to hear your comments
about how get on with this style. I love it and I know you will too!
Love
and hugs
xx
Sam xx
Photos of Cheryl Cole are from www.cherylcole.com/gallery/a-million-lights-tour


This is looks hard to achieve but seeing the result, it definitely paid off! I think that's one good advantage of having a long hair – we can play with it by trying different styles. I just wished I could grow my hair back to its normal length. Do you have styles that are good for a short hair? Anyway, I enjoy your posts and I'm looking forward to learn more DIY hair styling.
ReplyDelete--Stela Dimitrov--
Thanks for your comment! It's a bit fiddly working at the back of your head when you can't see what you're doing but you get used to it after a while. As I've always had long hair I don't have any styles for short hair at the moment. I will keep an eye out for some though.
ReplyDeleteMore blog entries coming soon so keep checking in :-)