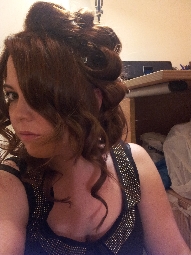
Monday, 31 December 2012

New Year's Eve Hair. . .

Decisions Decisions Decisions!!!!!

What style to do for New Years?
I started on L'Oreal's website looking for some ideas and discovered these fantastic little videos in the Styling section. There are three video tutorials on there for how to get Cheryl's three iconic L'Oreal looks: Work It, Glam It, Rock It. If you follow the link into Youtube there are actually more videos in the same range that cater for long and thick hair (see video below) as well as thinner hair. 

I watched all three and learnt some new techniques that I had never tried before. I decided to take part of the 'Work It' look but I will leave it down rather than pin sections back. Basically... I love the easy way he show you how to get loads of volume and will be using that for my look this evening.
Here's the video for you to watch too. It's really great. Then, below, I have included some photos of how I did it myself (because it's always good to see how a 'normal' - non stylist - person can follow it).


So, firstly, I washed my hair with Aussie Volume Shampoo and Conditioner (start as we mean to go on).

1. I applied a small amount of L'Oreal Extraordinary Oil onto the ends of my hair (I think I am actually addicted to the amazing smell of this stuff!)

2. I sectioned my hair into layers, starting at the bottom and working upwards. I sprayed on some L'Oreal Professional Techni-art Volume Mousse to the roots and some Elnett Satin Styling Volume Spray to the roots and mid lengths. I worked the products through each layer of my hair.
 

3. I used L'Oreal Studio Line Silk and Gloss Volume Mousse (about the size of my palm), flipped my head upside down and worked it through the mid lengths and ends.

Now my hair is prepped and ready to dry.

4. Still with my head upside down, I rough dried my hair with my hairdryer until it is about 80% dry.


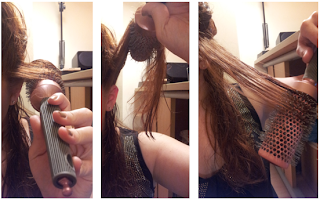
5. I flip my head back up right, then start on the bottom layer. Working in small sections I used my large round soft bristle brush (HeadJog Number 91). Before I blow dry each section I spray a small amount of Elnett Satin Styling Volume Spray onto the hair over the brush. This helps set the volume. Using a thin nozzle, I blow dry from underneath first, then curl the hair around the brush and concentrate the heat near to the roots. I finish off by smoothing the ends around the brush and use a little heat. 

I continue in this way all over my head.

Next is the bit I learnt from the tutorial video I mentioned at the beginning...

6. In small sections, backcomb as in the video. (check out that height!)

 7. Working on each backcombed section at a time, spray hairspray at the roots, then set with hair straighteners for 3 seconds.

8. Tease it out with a soft bristled brush and set with hair spray.


9. Finish with some Crystal Gloss Techni-Art spray for extra shine.

DONE!


DONE! Happy New Year People!!


Sam xxx


Sunday, 30 December 2012

Next day hair

I love my hair the day after its been blow dried and volumised! It's still got shape and plenty of volume and even though the curls have dropped it has left my hair in nice soft waves! All thanks to L'Oreal!

Love and hugs people!

Sam x

Saturday, 29 December 2012

Big Hair

So.. The other day, I came across this video interview Cheryl did for Sugar Scape. They asked her how she got her 'big hair'. She replied, saying that if she wasn't getting her hair blow dried the following day, she would apply L'Oreal Volume Mousse to her roots, then put her hair in a top know over night. I liked this idea and though I would give it a go. 

Here's how it worked out...

So in the evening, I washed my hair using Auusie Volume Shampoo and Conditioner. After applying L'Oreal Extraordinary Mousse to the ends of my hair, I used L'Oreal Volume Mousse in the roots and mid lengths, then rough dried my hair upside down. Then I put it in a top knot over night.

The next morning I was excited to see if it had worked just as Cheryl said.. I took out the top knot and let my hair down ....WOW... volume-ania!! I used my round brush to blow dry extra volume into the roots, spraying L'Oreal Styling Volume Spray onto each section before blow drying. 

I thought I would have another go at trying to recreate Cheryl's iconic tour hair from her sensational A Million Lights Tour. So next, I did three plaits on each side of my head, pulling the hair backwards. I kept the top section of hair free for making a quiff later. Then, I use my Diva hot wand to add curls to the ends of my hair. I finished the style by back combing sections of my hair at the back and pinning the front back into a quiff. 
finished book: 

The camera doesn't show the volume as well as it looks really, but I guess that means, I need to practice getting it bigger.. I'll work on that :)

Love and hugs people! 

x Sam x


Friday, 7 December 2012

Wave it!

So this morning I used the new Elnett styling curl spray to achieve a wavy curl. First I prepped and blow dried my hair as I mentioned in my post earlier this week. I'll post a link to it later. After the hair was blow dried with a round brush to give it some volume, I used the Elnett style curl spray on small sections at a time. I used the Diva hot rod to curl the sections starting from the bottom and working towards the top of my head.

I clipped back the front section of my hair and finished it off with Elnett stain hair spray.

40 minutes later, lovely wavy curls full of volume and shine and smelling beautiful!

Love and hugs people!
Enjoy your Friday!

xx Sam xx

Thursday, 6 December 2012

Nourish It with Elvive Extraordinary Oil

Tonight, I thought I would take some time to share with you my thoughts about the new L'Oreal Elvive Extraordinary Oil.

For those of you who haven't seen the advert, watch it here:

It claims to be the 5-in-1 miracle hair perfecter
They say that 90% of women agree that:
1. Hair has a glowing shine
2. Feels intensley nourished
3. Flows with silky softness
4. Seems sumptuously smooth
5. Looks beautifully perfected
and I can totally agree with all of them! 

The oil is silky that I wouldn't say it's oily or greasy at all. It's so light and soft that when you put it on the ends of your hair, it doesn't make your hair heavy or greasy looking. It smells divine - soft with a hint of vanilla.

I love to use the oil on the ends of my hair to smooth them. I have found that the oil even smells lovely on day 3, which is amazing!

I have found a little 'How To' guide on the L'Oreal website that is really good for showing how versatile the oil really is:


Enjoy! Hope you love the oil as much as me!

Tomorrow: Wave it!

Love and hugs,

xx Sam xx

Wednesday, 5 December 2012

Snow!

Couldn't believe it this morning when I woke up and saw the snow! However, in my excitement I didn't have a lot of time to sort my hair out so have gone for the same style as yesterday.

Last night, I brought Elnett styling spray for straight and curls so I now have the full set! Woo!

I will use use curl spray in one of my blog's this week. Excited to see the 3 day results!

Love and hugs,

xx Sam xx

Tuesday, 4 December 2012

Straight with a bit of oomph

Morning beautiful people,

Even though it was only 6.15 and still dark outside this morning, I woke up happy because I knew that doing my hair this morning wasn't going to be horrendous and time consuming. I washed my hair, then prepped and blow dried it as I explained in Sunday's blog post. Today, instead of curling it, I went over the mid lengths to ends with my straighteners then added a bit more volume by backcombing the crown area. I added a quiff to the front and fixed it with hair spray.
Done! All ready to go! Enjoy your day people!

Love and hugs

xx Sam xx

Monday, 3 December 2012

L'Oreal Paris Blog Follows Cheryl on tour

Evening beautiful people,

Thought I would share with you something I found a few months a go and still love!
L'Oreal Paris followed Cheryl on her Million Lights Tour and they created a blog with lots of backstage tips, tricks and inside info on Cheryl's perfect hair and make up!

Here it is for all of you who want to be in the know:

It covers everything from eye shadow to getting that perfect Cheryl-like quiff! Plus lots of hints and tips from the amazing Lisa Laudat! Love it!

Love and hugs,

xx Sam xx

Day 3- still looking good!

Morning!
So, its day 3 and I have woken up (again) to nice hair! The picture below is my bed hair this morning. I promise I haven't as much as combed it through with my fingers yet!

Yesterday I said I was probably going to put my hair up today, but it looks nice down and was so easy to sort out this morning I am going to leave it down. Will save the up do for another day this week.

Happy Monday everyone!

Love and hugs,

xx Sam xx

Sunday, 2 December 2012

3 day hair!

Wow! I absolutely love the Elnett Satin Heat Styling Volume Spray! 

It says it lasts 3 days but I have never known a hair product actually do exactly what it says! End of day 2 and my hair is still feeling fab and looking good. Now just to decide what style to wear to work tomorrow. . Thinking maybe low pony tail or top not. . Going to look at some of Cheryl's styles for some ideas.


Enjoy your Sunday evening peeps!
Love and hugs
xx Sam xx

Next Day Hair

Morning!!

Last night, I posted my first blog entry with my version of Cheryl Cole's A Million Light's Tour hair style. I loved it and it even still looked bouncy and full of volume when I went to bed in the early hours of this morning. 

Next challenge . . . taming the morning hair!

Luckily, my hair didn't look too bad this morning and with a quick run through with my fingers and a little spray to boost it up, it looked almost as nice as last night. This morning, I decided to just swoop the front section of my hair back, give it a little more volume at the crown and . . . ta da!


First, I sectioned off the front part, just as I did last night. This section did need a little bit of straightening to smooth it over, but  not much. I pinned it back as I did last night in my previous post. 

Happy Sunday everyone! 

Love and Hugs,


xx Sam xx


Cheryl Cole Style Hair

If you were lucky enough like me to have been to see Cheryl on her amazing Million Lights Tour this Autumn, you will (I am sure) have been in awe of her amazingly perfect locks!


For my first post in this blog, I am going to attempt to do my best to resemble that amazing style. Now, obviously it won't look identical because a) I don't look like Cheryl; and b) I am not a professional hair stylish like the super talented Lisa Laudat, who is the lady behind Cheryl's hair and make up. 

To help me know what to do, I have looked at many photos and watched lots of footage of Cheryl on tour, but also, recently Lisa Laudat did a Masterclass for L'Oreal and a lady called Ree did a blog about it. If you haven't seen it, I would definitly recommend it as it is where I learnt from. Find it here: http://www.reallyree.com/2012/11/elnett-styling-sprays-for-cheryl-cole.html

Ok.. Here's what I did:


First, here are the tools and products that I used:
The round brush I am using is from the Head Jog range – number 78, ionic ceramic; and the back comb brush, also from the Hed Jog range number 50.
The straightners are GHD and the curling wand is by Diva – Big Hot Wand. All perchased from Sally Salon Services (www.sallyexpress.com).

The hairdryer is by Nutriheat and I used the narrow end for this look.
  
Products:
Left to Right:
L’Oreal Paris Elnett Satin Hairspray Supreme Hold, Infinite Shine; L’Oreal Paris Studio Line Silk and Gloss Volume Mouse; L’Oreal Professionnel Paris Volume Lift Tecniart Force 3; L’Oreal Paris Elnett Satin Heat Styling Spray Volume; L’Oreal Elvive New Extraordinary Oil


Now, if you haven’t guessed already, L’Oreal is my favourite hair product range because they just seem to work for my hair so perfectly. They actually do what they say they do and they smell divine!


To begin, I washed my hair with a good Shampoo and applied conditioner from mid lengths to ends only (I use Aussie Shampoo, but pick one that is best for your hair type).

This is my ‘before’ shot……. Mmmm.. attractive!


1. I used L’Oreal Elvive New Extraordinary Oil on the very tips of my hair to help the ends. This oil is amazing! It finishes off the ends of your hair so nicely and smells heavenly!

2. Next, I sectioned my hair a layer at a time and sprayed L’Oreal Professionnel Paris Volume Lift Tecniart Force 3 at the roots on each layer.


It comes out a bit like a mouse and you have to use your fingers to rub it in to the hair. I did this for each layer of my hair, right to the top.


3. Next, I applied L’Oreal Paris Studio Line Silk and Gloss Volume Mouse to the lengths of my hair (about the size of my palm) making sure to work it all the way through.


As you can see my hair is naturally quite curly so I need to work quick before it dries too much!

4. Next I took the end off of my hair drier, flipped my head over and blow dried my hair roughly. Make sure you flip your head over to add extra volume!

I have to say, I quite liked it jut like this, but it’s not the look I am trying to get today. I will remember this one for one of my ‘can’t really be bothered’ days!

5. Now this is the bit that takes the time, but don’t rush it because it is the part that will give you the volume!
Section the hair and securely clip the rest back. Start on the bottom layer and work up towards the crown of your head. I sprayed L’Oreal Paris Elnett Satin Heat Styling Spray Volume on each section near the roots before blow drying to help add extra volume and hold.


When you blow dry your hair with the round brush, hold it like this to start with. Make sure you have the narrow end on your hair drier and then gently pull the hair upwards and blow dry close to the roots following the direction of the hair upwards towards the brush. When you get about half way along the length of the hair, go back to the start and repeat. Do this 4 or 5 times making sure you pull upwards and blow dry from underneath. Then, blow dry from the top moving the brush underneath the hair towards the ends. When you get to the ends, rotate the brush to blow dry the hair under just slightly.


You can already see the volume in this one section of hair. Now you repeat this method in small sections over the rest of your head!

*Warning* It get’s quite warm with the hair drier on for a long time, especially if you have thick hair like me, so you might want to open a window at this point!

6. When you do the back of your hair, try to keep you brush at the same angle as your head to get the best shape to the hair. A trick I have discovered is to hold my hair drier upside down so that I can blow dry the hair from underneath more comfortably. It is a bit fiddly, but not too bad once you get the hang of it.


7. You can see in the photo below that my hair is starting to get some shape and volume at the roots. Now I am near the crown, I started to blow dry section by section from the back, pulling it upwards and backwards to get Cheryl’s signature ‘bouffant’ look. I did this all the way to the very front.


8. Now it is all dried and I have given it as much volume as I can using the round brush, I used the Diva Big Hot Want to create curls.


9. I started by sectioning off the front section of my hair (in front of my ears) and clipping it up. I will sort this part out later.


10. *Please take care when using any curling wand as they get extremely hot! The Diva Big Hot Wand can reach 200 degrees and I found out what happens when you accidently touch it on your skin! The other day I burnt my hand quite badly, but it was my own fault because the Diva Big Hot Wand actually comes with a heat protection glove! Please use it! I wore it this time!


11. This time, start at the top of your head and take small sections of hair and spray a little L’Oreal Paris Elnett Satin Heat Styling Spray Volume near to the roots. Curl the hair around the wand and hold in place for 10-15 seconds. Gently release by sliding the wand out from the curl and pin the curl in place securely. Spray with a little L’Oreal Paris Elnett Satin Hairspray Supreme Hold to keep it’s shape whilst you do the rest of the head.
  

12. Repeat in small sections gradually working your way around and down the hair. As you move through the hair, alternate the direction of curl to give a much more natural end result.


13. Curl the front sections near to the face. I haven’t clipped mine up as I will be plaiting them later, but if you want them to last longer, clip them as the rest of the hair.
When you curl the very front sections of hair, make sure the direction of curl points away from the face. This will help to open up the overall look.
            

When you have finished, spray the whole head with hairspray and leave for a while to set.

14. Carefully remove the hair clips and run your fingers through the curls to release them a little from the hairspray. This will help them to fall more naturally.


15. Once you have let all the curls loose, it’s time to backcomb!
Now be careful with this – you don’t want to ruin your hair or make it look like you’ve just woken up!

Start at the crown and section part off. This will fall over the top to hide the back combing.


I parted a small section from the crown, sprayed a little hairspray on the front and back then I used the Hed Jog number 50 brush to carefully backcomb it. The picture above shows the section of hair standing on it’s own after backcombing! This shows you can make you hair as big as you want! I don’t want it quite this big, so will loosen it a bit in a minute.

Flip that section forwards and repeat for the next section underneath. You don’t have to go all the way down the you neck, I would say about half way would be enough to hold it up.
Flip the hair back and apply hair spray to hold it in place.


You can stop here, apply some more hairspray and enjoy your fab bouncy curls, but today I mentioned I was trying to get Chery’s A Million Lights Tour hairstyle, so I will continue…


Cheryl has beautiful long hair – much longer than mine – and this helps to pull her curls downwards and elongate them nicely. On each side she had 3 tight plaits that helped to show off the bouffant.


Here’s my attempt:
16. Next, the front section.
Lisa Laudat (Cheryl’s hair and makeup artist) suggests to use the width of your eyes as a guide to how much hair to pull back.
Use a comb to carefully collect a small section of hair at the front and pin it to the head using Kirby grips. To create the ‘poof’ at the front, as you pull the hair back, push it forwards a little too.


Again, you can stop here, if this is the look you want to achieve, but I am going to try and do the plaits on each side, so I will continue…

17. As before, section the front part of the hair off and clip back the rest. Split this section into three, clipping the top 2 back for now. Plait the hair along the side of the head and secure with a small elastic. If, like me, your plaits stuck out a little, use a hair grip to fasten it tight to the head. Repeat for the other 2 sections. Spray with hairspray.


18. Repeat this on the other side of the head and you’re done!


I hope you enjoyed reading this blog post and I would love to hear your comments about how get on with this style. I love it and I know you will too!


Love and hugs

xx Sam xx


Photos of Cheryl Cole are from www.cherylcole.com/gallery/a-million-lights-tour